Sometimes in Lightswitch you have too many records to scroll through, but not enough to justify the requirement for full searching capability.
An alternative is to use a Rolodex style index, where you can click on a letter, and see records beginning with that – similar to iPhone contacts

See this video for an example.
How to Reproduce
You need to create a query for doing the filtering, and then hook it up on your screen. Then create a custom control for displaying the index, and add in some CSS to make it look nice.
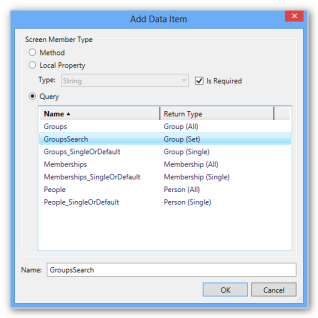
1. Create a new Query
This will be used to perform the filter operation. Add an optional parameter.

You’ll need to ‘Write Code’ and use preprocess_query, since the visual designer does not support ‘Starts With’. Your code might look like this:
using System;
using System.Collections.Generic;
using System.Linq;
using System.Text;
using Microsoft.LightSwitch;
using Microsoft.LightSwitch.Security.Server;
namespace LightSwitchApplication
{
  public partial class ApplicationDataService
  {
    partial void GroupsSearch_PreprocessQuery(string GroupSearchText, ref IQueryable query)
    {
       if (!String.IsNullOrEmpty(GroupSearchText))
         query = query.Where(g => g.Name.StartsWith(GroupSearchText));
    }
  }
}
2. Build your Screen
Build a ‘Browse Data’ screen, and use the add data item button to reference your query.
Now make sure that the visual collection for the screen (1) has its query source set to the new query (2).
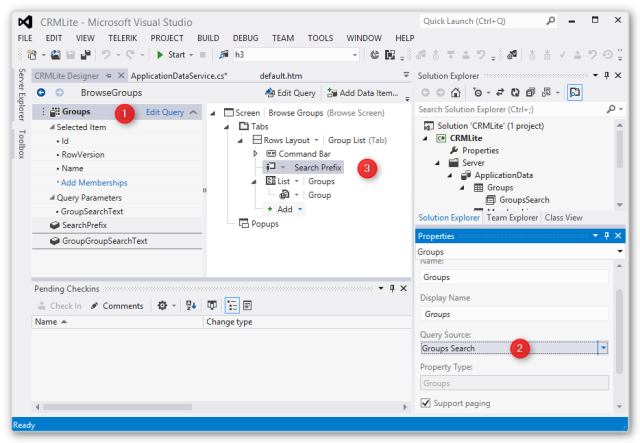
Add another data item to the screen, this time use a new string item called ‘Search Prefix’ (3). Your query parameter should be bound to this one.

3. Write your Custom Control
Choose your ‘Search Prefix’ control, and from the write code button, and the following to the render event:
/// <reference path="../GeneratedArtifacts/viewModel.js" />

myapp.BrowseGroups.SearchPrefix_render = function (element, contentItem) {
    // Write code here.
    var rolodexDefinition = $("<ul class='rolodex' data-value=''><li>A</li><li>B</li><li>C</li><li>D</li><li>E</li><li>F</li><li>G</li><li>H</li><li>I</li><li>J</li><li>K</li><li>L</li><li>M</li><li>N</li><li>O</li><li>P</li><li>Q</li><li>R</li><li>S</li><li>T</li><li>U</li><li>V</li><li>W</li><li>X</li><li>Y</li><li>Z</li></ul>");
    rolodexDefinition.appendTo($(element));

    $(".rolodex > li").click(function (e) {
        if (contentItem.value != $(this).text())
            contentItem.value = $(this).text();
        else
            contentItem.value = "";
    });

    $(document).ready(function () {
        $(".rolodex > li").click(function (e) {
            var wasSelected = $(this).hasClass("selected");
            $(".rolodex > li").removeClass("selected");
            if (!wasSelected) {
                $(this).parent().attr("data-value", $(this).text());
                $(this).addClass("selected");
            }
            else
                $(this).parent().attr("data-value", "");
        });
    });
};
4. Add the CSS
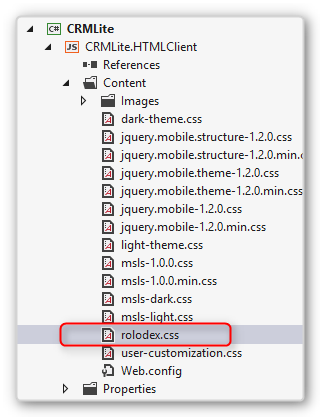
Switch to ‘file view’, and add a new CSS file to the Content folder.
Copy in the following CSS
.rolodex {
text-indent:0px;
padding-left:0px;
-webkit-margin-before: 0px;
-webkit-margin-after: 0px;
}
.rolodex li{
display:inline-block;
border:solid 1px #c0c0c0;
background-color:#F2F2F2;
color:#585858;
padding-top:7px;
padding-bottom:7px;
font: 10pt Arial;
cursor:hand; cursor:pointer;
border-radius:3px;
margin-top:3px;
margin-bottom:3px;
margin-right:4px;
width:25px;
text-align:center;
}
.rolodex li.selected {
background-color:#A9E2F3;
-moz-box-shadow: 0 0 3px 3px #CEE3F6;
-webkit-box-shadow: 0 0 3px 3px #CEE3F6;
box-shadow: 0 0 3px 3px #CEE3F6;
}
Make sure you reference the new CSS file from the default.htm file.

Now you should be right to run your project and use the index filter. See the video
Note: I’m only learning these technologies myself, so let me know if you can suggest any improvements to the code.
I hope this is useful for others.

Hi
Its really cool…
Is it possible in Silverlight client?
Hi Rashmi, I’m sure it would be easy for someone who knows silverlight, but that’s not me! I’m only looking at the HTML client because I think it will take over the desktop soon.
Amazing! Thanks for sharing. Looking forward to more posts Matt!
Matt,
Well, a potential nice to have improvement could be: “when a letter is not applicable (because there are no potential results) it is greyed out”.
That is a nice and easy approach 🙂 Thanks for sharing
Please do write some more HTML – Client based blog posts !
“because I think it will take over the desktop soon.” — +1
Great idea and an excellent presentation. I hope you do more of these presentations.
Hey Matt,
This is a great article. Thanks so much, and keep them coming!
Cheers,
[…] Rolodex index style filter for Lightswitch […]